How to Use a Polariscope: A Practical Guide for Gem Testing
You pick up a stone. It catches the light beautifully. But is it corundum or glass? A spinel or a synthetic? One small tool can tell you in under a minute, and most gemmologists overlook just how powerful it really is.
The polariscope is one of the most underrated instruments in a gemmologist’s kit. It looks simple, it costs relatively little, and it takes only moments to use. Yet it can tell you something fundamental about a gemstone that no loupe or refractometer alone can confirm: whether light travels through it in one direction or two.
In this guide, we will walk through exactly how to use a polariscope, what patterns to look for, and what those patterns actually mean. Whether you are working through your Gem-A studies or just want to sharpen your practical testing skills, this is worth reading carefully.
What does a polariscope actually do?
At its core, a polariscope helps you determine the optical nature of a gemstone, specifically whether it is singly refractive (isotropic) or doubly refractive (anisotropic). It can also reveal polycrystalline gems and, in some cases, identify a stone outright.
The instrument is made up of two polarising filters set at 90 degrees to each other, what is called the crossed position. When no stone is present, the stage appears dark. When you place a gem between those two filters and rotate it, the way light behaves tells a detailed story.
One important limitation to know: the gemstone must have some transparency. Fully opaque stones cannot be tested, and heavily bezel-set gems may be tricky if the setting blocks the light path underneath.
The two types of polariscope
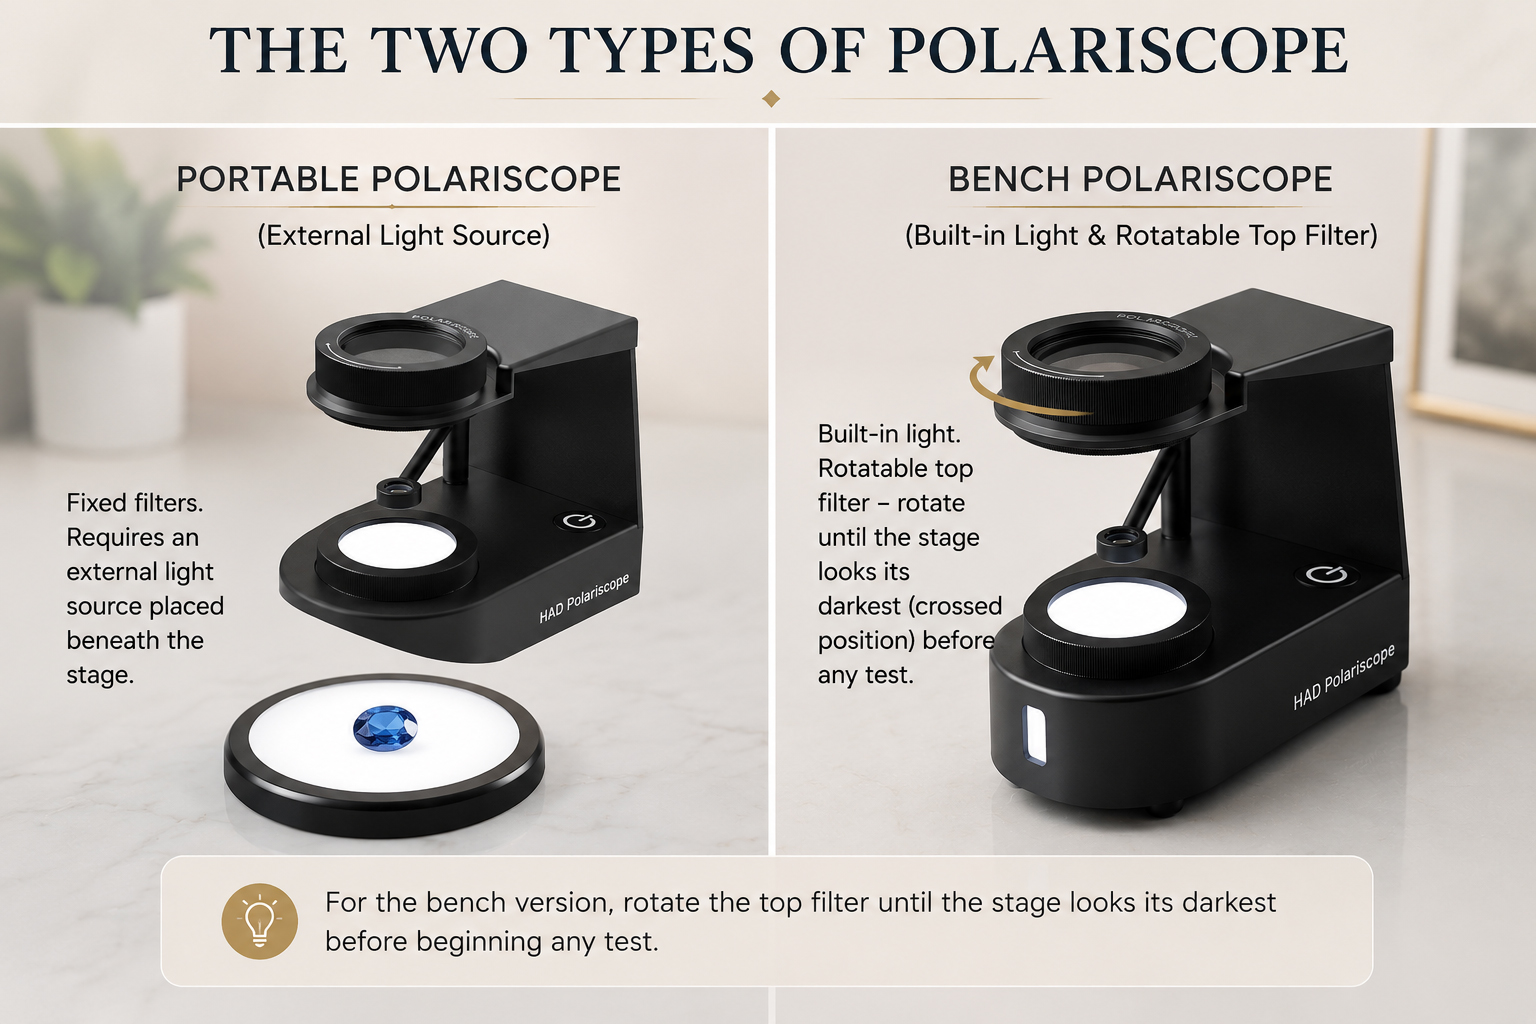
You will likely encounter two versions. The portable polariscope, which is included in the Gem-A student kit, has fixed filters and needs an external light source beneath it. The bench polariscope has a built-in light and a rotatable top filter that you manually turn to reach the crossed position. For the bench version, rotate the top filter until the stage looks its darkest before beginning any test.
The four patterns to know
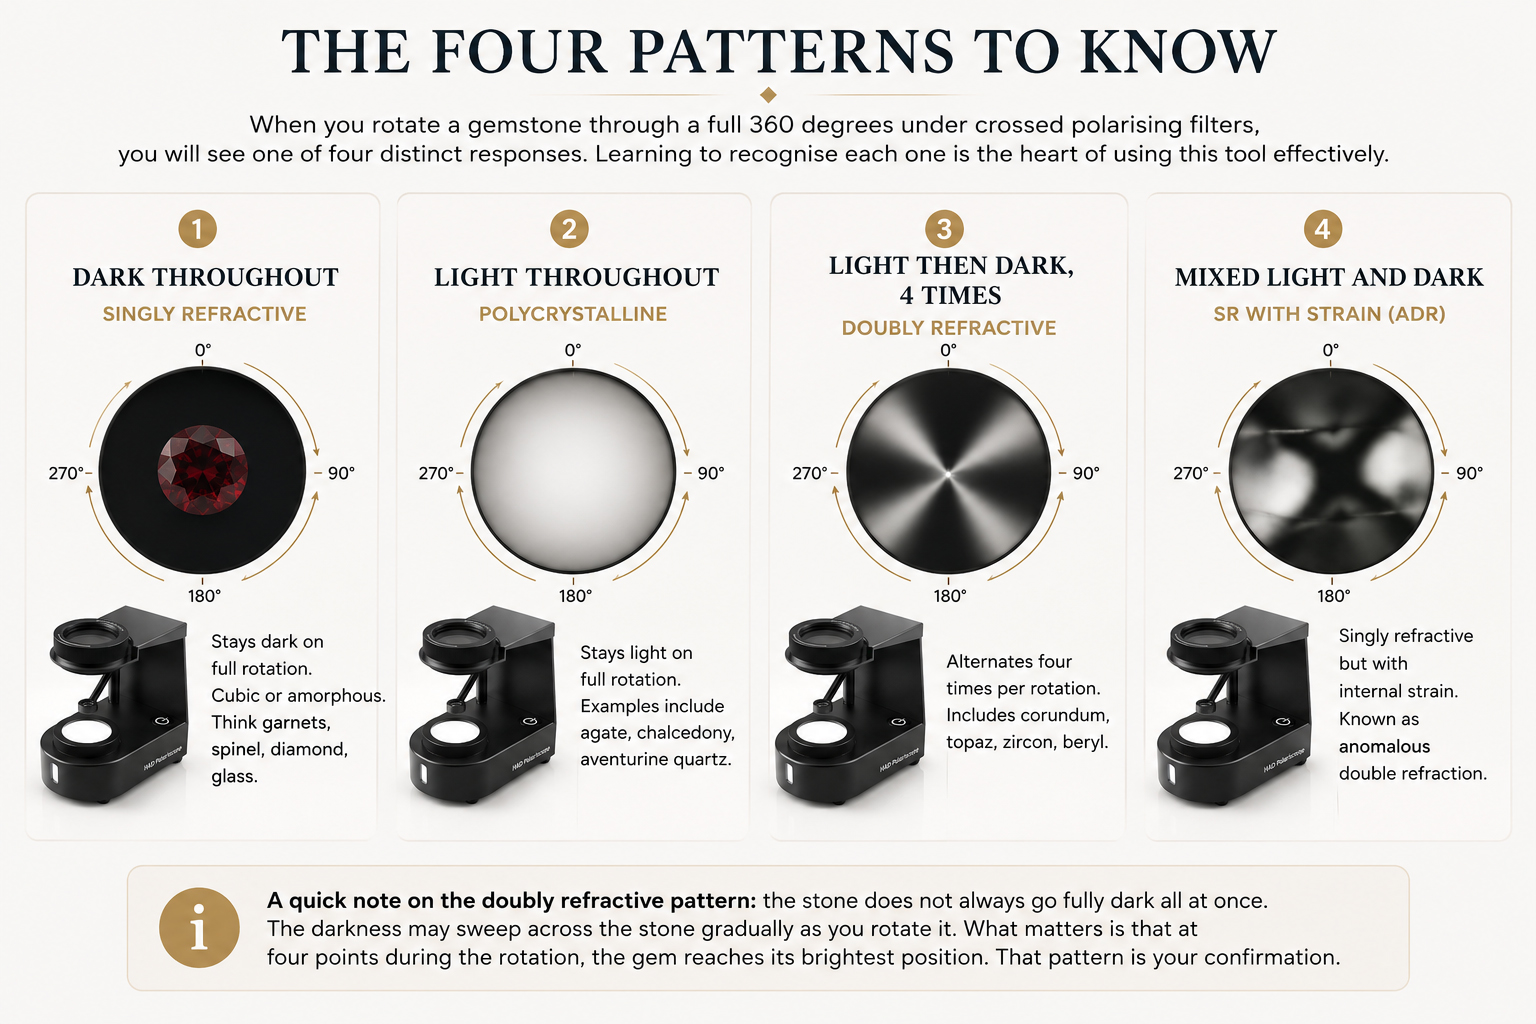
When you rotate a gemstone through a full 360 degrees under crossed polarising filters, you will see one of four distinct responses. Learning to recognise each one is the heart of using this tool effectively.
The first pattern is a stone that stays completely dark throughout the entire rotation. This tells you the gem is singly refractive, meaning it sits in either the cubic crystal system or is amorphous in structure. Garnets, spinel, diamond, and glass all fall into this category. If you see consistent darkness with no variation, you are looking at a stone that allows light to pass through in only one direction.
The second pattern is the opposite: a stone that remains light throughout the full rotation. This result points to a polycrystalline gem, one made up of many tiny crystals rather than a single ordered structure. Examples include agate, chalcedony, and aventurine quartz. The light does not follow the rules of a single crystal, so it stays bright regardless of orientation.
The third pattern is the most dramatic and arguably the most satisfying to spot. The stone alternates between light and dark exactly four times during one full 360 degree rotation. This confirms the gem is doubly refractive, meaning light splits into two rays as it travels through the stone. Corundum, topaz, zircon, and beryl all produce this result. Worth noting: the stone does not always snap cleanly to dark all at once. The darkness may sweep gradually across the face as you rotate it, but it will reach four fully bright positions during the turn, and that is what you are looking for.
The fourth pattern is a mix of light and dark that persists throughout the whole rotation without settling into either state cleanly. This still indicates a singly refractive gem, but one that carries internal strain within its crystal structure. This is known as anomalous double refraction, or ADR. The stone is structurally the same as those in the first pattern, it just carries some stress that causes an irregular optical response. Two specific versions of this pattern are particularly useful: a writhing, snake-like movement points strongly to man-made glass, while a blocky striped appearance called tabby extinction is characteristic of synthetic spinel.
Singly refractive but with internal strain. Known as anomalous double refraction.
A quick note on the doubly refractive pattern: the stone does not always go fully dark all at once. The darkness may sweep across the stone gradually as you rotate it. What matters is that at four points during the rotation, the gem reaches its brightest position. That pattern is your confirmation.
What is anomalous double refraction?
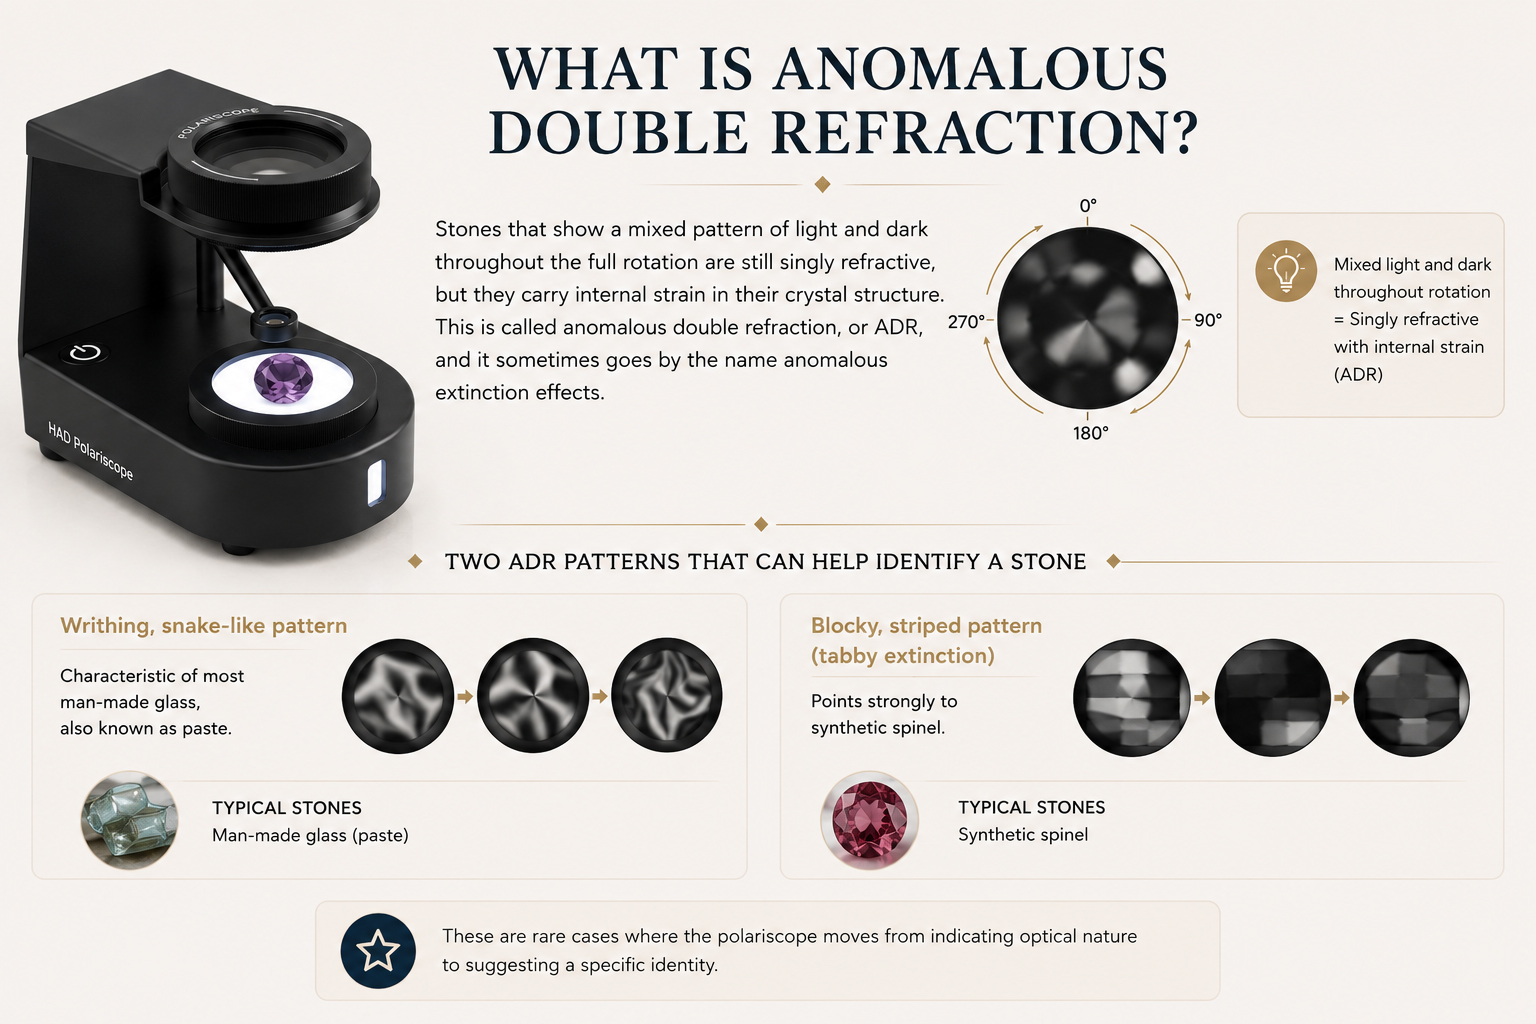
Stones that show a mixed pattern of light and dark throughout the full rotation are still singly refractive, but they carry internal strain in their crystal structure. This is called anomalous double refraction, or ADR, and it sometimes goes by the name anomalous extinction effects.
Two specific ADR patterns can actually help you identify a stone. A writhing, snake-like pattern is characteristic of most man-made glass, also known as paste. A blocky, striped pattern called tabby extinction points strongly to synthetic spinel. These are rare cases where the polariscope moves from indicating optical nature to suggesting a specific identity.
Common pitfalls and how to handle them
Even experienced gemmologists encounter a few visual traps when using the polariscope. Here is what to watch for:
Inclusions like fractures or crystal fragments can catch light from below and react independently from the rest of the stone. The fix is straightforward: focus on the body of the gem and ignore what the inclusions are doing.
A dark rim sometimes appears around the edge of a gem even when it is in its light position. This happens because the crown facets at certain angles reflect light away from the polariscope. To check whether that rim is a real result or a facet artefact, remove the top filter from your portable polariscope. What you see then is how the stone would look at its lightest. If the dark areas are still present without the filter, you can safely disregard them in your test.
For bi-coloured or unevenly coloured stones, be careful not to mistake a change in body colour for the stone going light or dark. Again, removing the top filter and comparing with and without it will help you separate colour tone from optical response.
A note on the optic axis
If you see iridescence rather than clear light and dark patterns when looking through the polariscope, you may be looking straight down the optic axis of a doubly refractive gem. This is not an error in your testing; it is simply a viewing angle issue. Rotate the stone onto a different face and test again to get a clear reading of the standard light-dark pattern.
The polariscope is genuinely one of those tools that rewards time and repetition. The first few tests can feel uncertain, especially when you are trying to distinguish a dark rim from a true dark response, or when inclusions are distracting. But with practice the four patterns become easy to read, and the process becomes second nature.
If you are building out your testing routine, the polariscope deserves a regular spot in your workflow. It is fast, non-destructive, and it gives you fundamental optical information that narrows down your identification possibilities before you reach for any other instrument.
Start with stones you already know. Test a garnet, a piece of glass, a piece of chalcedony. Watch the patterns form. Once you have seen each one clearly in a known stone, you will recognise them confidently in unknowns.